
Synology DS224+: How to upgrade hard drives in RAID 1
Introduction
The Synology DiskStation DS224+ is a compact 2-bay NAS designed for home users and small offices. It's powered by an Intel Celeron J4125 quad-core processor (2.0 GHz, burst up to 2.7 GHz), comes with 2GB of DDR4 RAM (expandable to 6GB), and consumes only around 15 watts under full operation. The DS224+ supports both Synology Hybrid RAID (SHR) and traditional RAID configurations (RAID 0/RAID 1), making it a versatile solution for centralized data storage and backup.
After some time using the NAS, I decided to upgrade the hard drives to increase the storage capacity. The great thing about RAID 1 (mirroring) is that you can replace the drives one at a time, allowing the array to rebuild between replacements, which means no data loss and no downtime during the upgrade process.
This post documents the step-by-step procedure I followed to upgrade from my original drives to 2x 16TB drives, effectively increasing my usable storage capacity.
Prerequisites
Before you begin, make sure you have:
- Backup your data: Even though RAID 1 provides redundancy, always have a backup before any hardware changes
- New drives: 2x Seagate IronWolf Pro 16TB (ST16000NT001) - 7200 RPM, CMR, 256MB cache
- Check drive compatibility: Verify your drives are on Synology's compatibility list
- Run data scrubbing: Perform a data scrubbing operation before starting (see below)
- Time: The rebuild process can take several hours per drive
- Access to DSM: Ensure you can access your NAS web interface
One of the prerequisites above deserves special attention: data scrubbing. If you're not familiar with this operation, here's what you need to know.
What is data scrubbing?
Data scrubbing is a maintenance operation that scans your storage pool to detect and repair data inconsistencies before they become a problem. It's essentially a health check for your drives and file system.
There are two types of scrubbing:
- RAID scrubbing: Verifies that all parity data is consistent across the array. This is only available for SHR (with 3+ drives), RAID 5, RAID 6, or RAID F1. For a 2-drive RAID 1 setup, this type of scrubbing is not available.
- File system scrubbing: Available for Btrfs volumes, this uses checksums to verify data integrity and can repair corrupted data using redundant copies.
Running data scrubbing before a drive upgrade ensures that your existing data is in a healthy state before you start replacing drives. If there are any issues, it's better to discover and fix them while you still have both original drives in place.
To run data scrubbing:
- Open Storage Manager in DSM
- Go to Storage Pool
- Select your pool to expand its details
- Under the Data Scrubbing section, click Run Now
Note
Data scrubbing can take several hours depending on your storage size. In my case, it took about 9 hours for ~6TB of data. It's recommended to run it during off-peak hours. Synology recommends running data scrubbing every 6 months as part of regular maintenance.
Current setup
Before starting the upgrade, here's my current configuration:
- NAS Model: Synology DS224+
- Current drives: 2x Synology HAT3300-6T (6TB, 5400 RPM, SATA III)
- Storage pool type: SHR (Synology Hybrid RAID) / RAID 1
- File system: Btrfs
- Total raw capacity: 12TB (2x 6TB)
- Usable capacity: 5.4TB (mirrored)
The Synology HAT3300 Plus series drives are specifically designed for NAS use, featuring a 1 million hour MTTF and a workload rating of 180TB/year. They've been reliable drives, but it's time for more storage space.
Upgrade procedure
The upgrade process involves replacing one drive at a time. For each drive, you'll deactivate it, physically swap it, then repair and expand the storage pool. The DS224+ supports hot swapping, so you don't need to power off the NAS, though you can do so if you prefer.
Step 1: Identify the drive to replace
First, identify which drive you want to replace:
- Open Storage Manager in DSM
- Select Storage from the left menu
- Under Drive Info, note which drive number corresponds to each drive
In my case, I'll start by replacing Drive 1 as shown in the screenshot below.

With the drive identified, the next step is to locate its physical position in the NAS.
Step 2: Locate the physical drive
Before removing anything, confirm which physical bay contains the drive:
- Go to Storage Manager > HDD/SSD
- Select the drive you want to replace (e.g., Drive 1)
- Click Locate Drive
The drive bay LED will change from green to amber for about a minute, as shown below. This prevents accidentally removing the wrong drive.
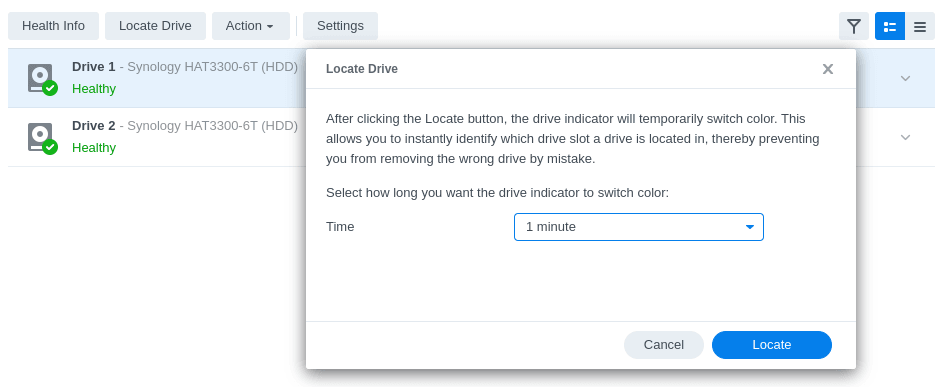
Once you've confirmed which bay contains the drive, you can proceed to deactivate it.
Step 3: Deactivate the drive
Deactivating the drive before removal is the safest approach:
- With the drive still selected in HDD/SSD
- Click the Action menu
- Select Deactivate Drive
- Confirm when prompted
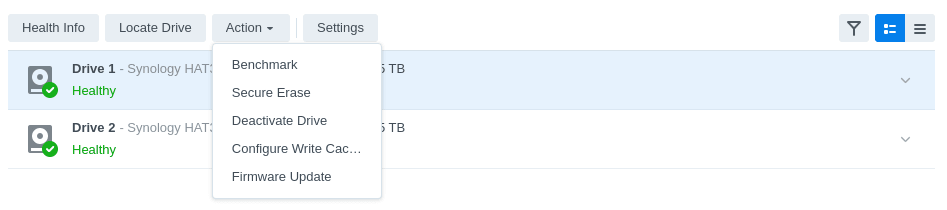
After confirmation, the storage pool will enter a degraded state and the NAS will start beeping. Don't worry - this is expected behavior and we'll address it in the next step.
Step 4: Mute the beep alert
To stop the beeping:
- Open Control Panel
- Go to Hardware & Power
- Click the Mute button
The NAS is designed to alert you when the storage pool is degraded - this is expected behavior during the upgrade.
Step 5: Replace the physical drive
Now swap the drive:
- The DS224+ supports hot swapping, so you can replace the drive without powering off
- If you prefer, you can power off the NAS first via Control Panel > Hardware & Power > Shutdown
- Remove the deactivated drive from its bay
- Insert the new 16TB drive into the same bay
- If you powered off, turn the NAS back on
Step 6: Repair the storage pool
Once the new drive is detected, you need to initiate the repair process to rebuild the RAID array:
- Open Storage Manager > Storage
- Click the three-dot menu (⋯) next to your storage pool
- Select Repair
- In the repair window, select the new drive you just installed
- Click Next, confirm the settings, and click Apply
The screenshot below shows the repair dialog where you select the newly installed drive.
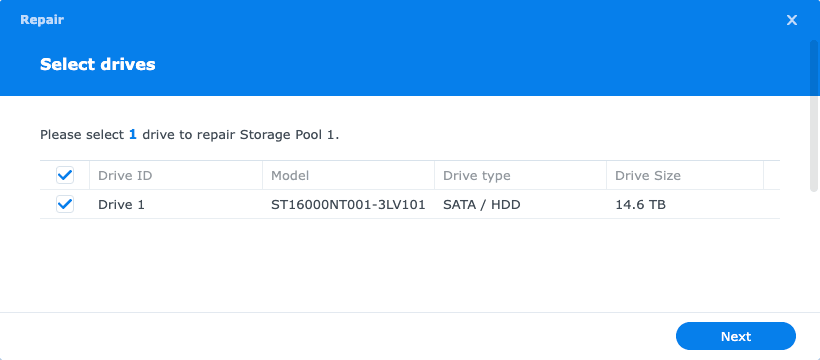
Once the repair starts, the system health will change from "Critical" to "Warning".
Note
At this point, the storage pool capacity will not increase yet. In RAID 1, the usable capacity is limited by the smallest drive. Since the other drive is still 6TB, the new 16TB drive will only use 6TB for mirroring. The expansion will happen after replacing the second drive.
Step 7: Wait for the first repair to complete
The repair process will take several hours:
- Status: The storage pool will show as repairing
- Duration: In my case, about 10.5 hours for ~5.4TB of data
- Monitor progress in Storage Manager
Warning
Do not power off the NAS or replace the second drive until the repair is complete. The storage pool must return to "Healthy" status before proceeding.
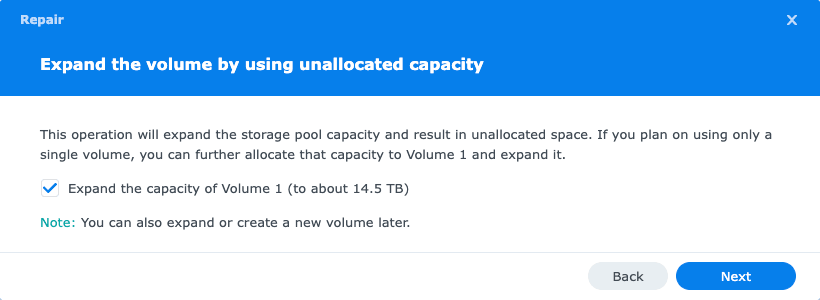
Step 8: Replace the second drive
Once the first repair is complete and the storage pool shows Healthy, it's time to replace the second drive:
- Repeat Steps 1-6 for the second drive (locate, deactivate, swap, repair)
- During the repair process, you should now see the option to expand the capacity
- Check the box to expand, as both drives will now be 16TB
As shown in the screenshot below, this time the repair dialog includes an option to expand the storage pool capacity. This is because both drives will now be 16TB, allowing the RAID to use the full capacity.
Step 9: Wait for the second repair and expansion
Wait for the second repair and expansion to complete:
- Repair duration: About 6-7 hours for the RAID rebuild
- Expansion duration: About 14-15 hours for the storage pool expansion
- Total duration: 21.5 hours
- Once complete, the storage pool will show Healthy with the new 14.5TB capacity
Interestingly, the repair phase was faster than the first drive (6-7 hours vs 10.5 hours), but the expansion phase added significant time to the process.
Verification
After completing the upgrade, verify that everything is working correctly:
- ✅ Storage pool shows Healthy
- ✅ Total capacity reflects the new drive sizes
- ✅ All shared folders are accessible
- ✅ Data integrity check (spot-check some files)
The screenshot below shows the final storage pool configuration with both 16TB drives healthy and the full capacity available.
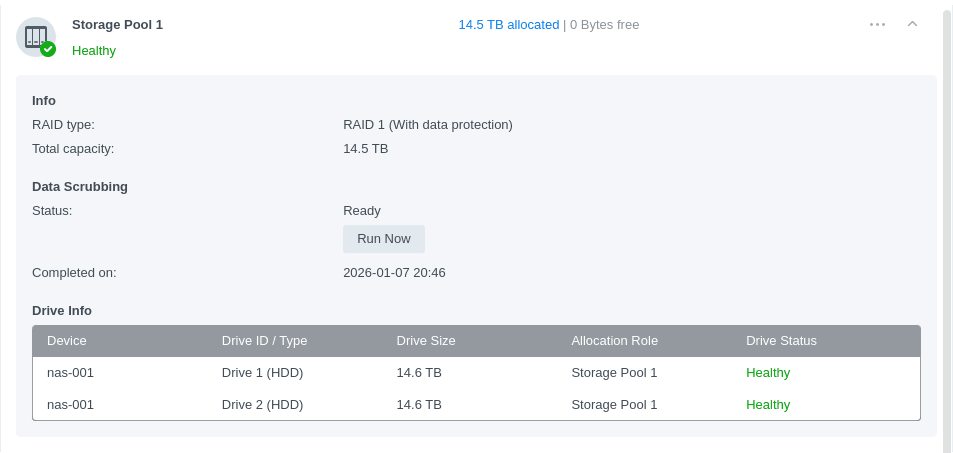
Final configuration:
- New drives: 2x Seagate IronWolf Pro 16TB (ST16000NT001)
- Total raw capacity: 32TB (2x 16TB)
- Usable capacity with RAID 1: 14.5TB
Timeline summary
| Step | Duration |
|---|---|
| Data scrubbing (before starting) | 9 hours |
| First repair | 10.5 hours |
| Second repair and expansion | 21.5 hours |
| Total time | ~41 hours |
Conclusion
Upgrading the hard drives in my Synology DS224+ was a straightforward process that required minimal hands-on effort. Despite the total process taking about 41 hours, the actual work on my part was just a few minor operations: deactivate, swap, repair, and repeat. The NAS handled everything else autonomously, allowing me to focus on other tasks while it rebuilt and expanded the storage pool.
This experience reinforced why I chose a Synology NAS in the first place. The premium cost is justified by the polished software, reliable hardware, and well-documented procedures that save time and reduce the risk of errors. As a busy person, I value solutions that work reliably without requiring constant attention or troubleshooting.
Key takeaways:
- Minimal effort: Just a few clicks and physical drive swaps - the NAS handles the rest
- No data loss: RAID 1 allows replacing drives one at a time while maintaining redundancy
- Patience required: Plan for ~41 hours total (data scrubbing + two repair cycles + expansion)
- Nearly 3x capacity: Upgraded from 5.4TB to 14.5TB usable storage
The extra storage headroom should serve me well for the foreseeable future, and when it's time to upgrade again, I know the process will be just as painless.
References


