
React : Babel + Webpack + Sass boilerplate application
Introduction
In this tutorial, we'll see how to build from scratch a React application with Webpack, Babel, and Sass.
The main requirement for this tutorial is to have a node installation with npm for your platform/OS.
The tutorial is structured in several parts:
- Create an initial project directory
- Webpack setup
- Babel setup
- React
- Add support for Sass styles
Initial project
The first step is to create an initial empty project. For that purpose we'll create an empty directory for the project and run the following command:
npm init -yThis command will set up a new package.json file
containing metadata for an empty project.
Relevant parts of the generated package.json should
be updated to match those of the project, this is the contents of the file after the initial modifications:
{
  "name": "react-webpack-babel-sass-boilerplate",
  "version": "2.0.0",
  "description": "Boilerplate React application with Webpack, Babel and Sass.",
  "main": "index.js",
  "scripts": {
    "test": "echo \"Error: no test specified\" && exit 1"
  },
  "repository": {
    "type": "git",
    "url": "git+https://github.com/marcnuri-demo/react-webpack-babel-sass-boilerplate.git"
  },
  "keywords": [],
  "author": {
    "name": "Marc Nuri",
    "url": "https://blog.marcnuri.com"
  },
  "license": "Apache-2.0",
  "licenses": [
    {
      "type": "Apache-2.0",
      "url": "http://www.apache.org/licenses/LICENSE-2.0"
    }
  ],
  "bugs": {
    "url": "https://github.com/marcnuri-demo/react-webpack-babel-sass-boilerplate/issues"
  },
  "homepage": "https://github.com/marcnuri-demo/react-webpack-babel-sass-boilerplate#readme"
}
Webpack 4 support
Webpack setup
The next step is to add support for Webpack.
npm install --save-dev webpack webpack-dev-server webpack-cli html-webpack-plugin html-loaderThe previous command will add Webpack development dependencies to our package.json.
The first three are strictly Webpack related, if you've worked with Webpack in other projects probably you'll
already have them installed as global dependencies. For our purposes, and to support different versions of
Webpack, we'll install them as local development dependencies.
The other two dependencies (html-webpack-plugin, html-loader) will be used to minimize HTML and to be able to reference the bundled Javascript for our application.
After running the command, a new section will be created in our package.json with
the new "devDependencies".
Webpack configuration
The first step is to create some source content that Webpack will process. We create a new directory for our
sources (src) and add a new index.html file
in this directory with the following content:
<!DOCTYPE html>
<html lang="en">
<head>
  <meta charset="UTF-8" />
  <title>react-webpack-babel-sass-boilerplate</title>
</head>
<body>
  <div id="root"></div>
</body>
</html>
For Webpack (4) to work, we are going to need a new webpack configuration file. We must create an
empty webpack.config.js in
the project's root
directory and add the following content:
const webpack = require('webpack');
const HtmlWebpackPlugin = require('html-webpack-plugin');

const SRC_DIR = __dirname + '/src';
const DIST_DIR = __dirname + '/dist';

module.exports = {
  entry: [
    SRC_DIR + '/index.html',
  ],
  output: {
    path: DIST_DIR,
    publicPath: '/',
    filename: 'bundle.js'
  },
  module: {
    rules: [
      {
        test: /\.(html)$/,
        exclude: /node_modules/,
        use: {
          loader: 'html-loader',
          options: {minimize: true}
        }
      }
    ]
  },
  resolve: {
    extensions: ['*', '.js', '.jsx']
  },
  plugins: [
    new webpack.HotModuleReplacementPlugin(),
    new HtmlWebpackPlugin({
      template: SRC_DIR + '/index.html',
      filename: './index.html'
    })
  ],
  devServer: {
    contentBase: DIST_DIR,
    hot: true,
    port: 9000
  }
};
In the first section we add the script requirements and declare two constants
(SRC_DIR, DIST_DIR) for the source and distribution directories.
Next, we declare a new module using the index.html file
we created in the earlier step as the entry point. The output files for the module will be generated in a
directory named ./dist. When the project is built a minimized index.html file
and a bundle.js will be generated in this directory.
In the rules section, we are going to add our first loader. In this case, we are going to use
the html-loader to preprocess all of the html files located in the src directory.
Next, we define the resolve extensions. This configuration for extensions allows us to import resources using
only the filename, so when importing a component in our code (import Component from ./feature/Component') Webpack will look for the component source file
in ./feature/Component
, ./feature/Component.js and ./feature/Component.jsx.
In the plugins section, we are going to add Webpack's HotModuleReplacementPlugin which
exchanges, adds, or removes modules while the application is running without the need for a full reload whenever
a change is made to the source code (hot reloading).
We are also going to add HtmlWebpackPlugin which will add our bundled javascript in the index.html file
we created earlier.
Finally, we are defining a devServer to serve our module using hot reloading in port 9000.
package.json webpack scripts
The final step to set up Webpack 4 is to add some scripts to package.json file
so that the application can be built and served:
"scripts": {
    "build": "./node_modules/.bin/webpack -p --mode production",
    "start": "./node_modules/.bin/webpack-dev-server --config ./webpack.config.js --mode development",
    "test": "echo \"Error: no test specified\" && exit 1"
  },
The first script (npm run build) will build the application in our dist directory
generating two files: index.html and bundle.js. These files could be deployed and
served by a web server without further configurations.
The second script (npm start) will launch a development server with the compiled module and will
listen for changes. When invoked, we could open our browser and point to http://localhost:9000 where the application should now be available.
Any change to any of the source files should trigger a reload in the browser and changes should be displayed.
A particularity for these scripts is that they are triggering local webpack client installation
(./node_modules/.bin/webpack) instead of the maybe globally available webpack client
(webpack). This will allow us to run a specific version of webpack in our project, controlled
at devDependencies section of package.json.
Babel 7 support
Babel setup
The next step is to add support for Babel. Babel will be in charge of transpiling JSX and Javascript to ES5 compatible Javascript. React recommends writing code using JSX syntax as it provides an easy way to mix HTML code with regular Javascript.
npm install --save-dev @babel/core babel-loader @babel/preset-env @babel/preset-reactThe previous command will add all Babel development dependencies to our package.json. @babel/core package
will add basic support for Babel. babel-loader will enable running Babel from
webpack, @babel/preset-env will add support to transpile Javascript > ES5 files into ES5
compatible Javascript. @babel/preset-react will add support to transpile JSX files.
We'll also add some additional plugins that will make our life easier when coding and add support for new Javascript features. These plugins will also serve as an example of how we must configure Babel + Webpack to enable them.
npm install --save-dev @babel/plugin-proposal-object-rest-spread @babel/plugin-syntax-dynamic-import @babel/plugin-transform-runtime @babel/runtimeBabel configuration
In previous Babel versions, we used to add configuration in a .babelrc file.
Since Babel 7, the recommended approach is to
set the configuration in a project-wide babel.config.js file.
The configuration file will be used to load the presets and the plugins we've added in our devDependencies
section of our package.json in
the previous step.
module.exports = {
  presets: ['@babel/preset-env', '@babel/preset-react'],
  plugins: [
    '@babel/plugin-transform-runtime',
    '@babel/plugin-proposal-object-rest-spread',
    '@babel/plugin-syntax-dynamic-import'
  ]
};
Now we have to configure webpack to use the Babel loader and
preprocess jsx and js files before packaging them. To do so we'll add the following
rule to the module rules section in webpack.config.js:
{
  test: /\.(js|jsx)$/,
  exclude: /node_modules/,
  use: {
    loader: 'babel-loader'
  }
},
From this point whenever any of the defined Webpack scripts is triggered, Babel will run and transpile js/jsx
using the presets defined and configurations defined in babel.config.js file.
React
React setup
In order to be able to use React in the project we must add two additional packages:
npm install --save react react-domThe previous command will add React dependencies to our package.json.
Application entrypoint
Next, we are going to create the entry point for our demo React application. For this purpose, we'll create
an index.jsx file
under the src directory with the following content:
import React from 'react';
import ReactDOM from 'react-dom';
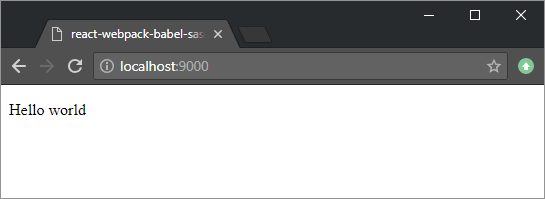
ReactDOM.render(
<p>Hello world</p>,
document.getElementById('root')
);
if (module.hot) {
module.hot.accept();
}This file will render <p>Hello world</p> inside the <div id="root"... tag in the index.html file
we created in the previous step.
As of now, we could already launch our application using npm start command and load our application
pointing our browser to http://localhost:9000/
Hot Module Replacement
Our application includes Webpack's Hot Module Replacement plugin (HMR). This plugin exchanges, adds or removes modules from an application while it's running without the need of triggering a full reload. This improves performance and development productivity because changes in the source code are reflected almost instantly without the need to completely redeploy the application.
Any change to a source file will trigger an automatic page reload in the browser and changes will be reflected instantly.
The only drawback to HMR is that it doesn't preserve the application state. In a future post we'll see how we can use React Hot Loader to speed up even more application development by preserving the application state.
React App Component
In order to keep the code structured, we are going to add our first component to the application and nest it
inside our main index.jsx.
We'll create an app.jsx file
with the following content:
import React, {Component} from 'react';

const content = 'Hello world!';

class App extends Component {
  render() {
    return (
      <p>{content}</p>
    );
  }
}

export default App;
Next, we'll import the new component in index.jsx (import App from "./app";) and add the new component:
/* ... */
ReactDOM.render(
    <App/>,
    document.getElementById('root')
);
/* ... */
SCSS support
Although React offers several ways to style components and there are plenty of styling libraries available, I still find it useful to use plain old school CSS or Sass style sheets to style the application. The main reasons are that Sass allows me to share variables, media queries, partials, mixins… efficiently throughout the application and even between different code bases with different frameworks (I can share the same SCSS library between a site built with React, Angular, Hugo…).
SCSS Setup
In order to preprocess SCSS files, we'll need to add a couple of loaders to webpack and the Sass
preprocessor LibSass bindings for node
(node-sass):
npm install --save-dev mini-css-extract-plugin css-loader sass-loader node-sassmini-css-extract-plugin will be in charge of extracting all of our generated css into a single
file. css-loader will be in charge of our css modules (explained later on) and of resolving styles
within our React components. sass-loader and node-sass will be responsible for SCSS
preprocessing and compiling Sass into regular CSS.
Next we add a new rule to the module rules section of our webpack.config.js to
invoke the loaders we just added:
{
  test: /\.(scss|sass|css)$/,
  exclude: /node_modules/,
  loaders: [
    MiniCssExtractPlugin.loader,
    {
      loader: 'css-loader',
      options: {
        modules: true,
        sourceMap: true,
        importLoaders: 1,
        localIdentName: '[local]___[hash:base64:5]'
      }
    },
  'sass-loader',
  ]
},
Here we are referencing the 3 loaders we just installed. For css-loader we add a special
configuration to support CSS modules (explained in the CSS modules section).
We also need to add a reference and configuration for MiniCssExtractPlugin in the plugins section
(Please review full webpack.config.js file
to check imports and constant declarations):
new MiniCssExtractPlugin({
  filename: devMode ? '[name].css' : '[name].[hash].css',
  chunkFilename: devMode ? '[id].css' : '[id].[hash].css',
})
In these lines we define MiniCssExtractPlugin plugin configuration and how is our CSS file going to
be generated.
Global SCSS
For our global styles we'll create the following structure:
src
└─┬ styles
  ├─┬ partials
  | ├── _base.scss
  | ├── _mixins.scss
  | └── _variables.scss
  └── main.scss
main.scss file
contains imports for the partials files. As an example we've included three Sass partials files: _variables.scss to
declare variables for colors, fonts, etc.; _mixins.scss which
includes an example mixin to make a box resizeable; and _base.scss which
includes the basic styles for the application.
In order to enable these global styles in the application, we need to import the main.scss styles
in our app.jsx,
this is as simple as adding the following line to the imports section: import styles from './styles/main.scss';. Webpack will automatically resolve and add the imports during transpilation using
the module rule and loader we added in the previous step.
CSS Modules: component styling
In the previous section, we saw how to declare the global styles for our application. In this section, we'll see how to use CSS modules to enable per component SCSS styles to React.
In webpack.config.js we
declared a rule for SCSS processing and the configuration for css-loader. To enable CSS modules we
declared css-loader with several options: modules: true and localIdentName which configures the way class names will be extended. What we are
doing here is basically enabling the css modular approach and appending a hash to classes defined in each file.
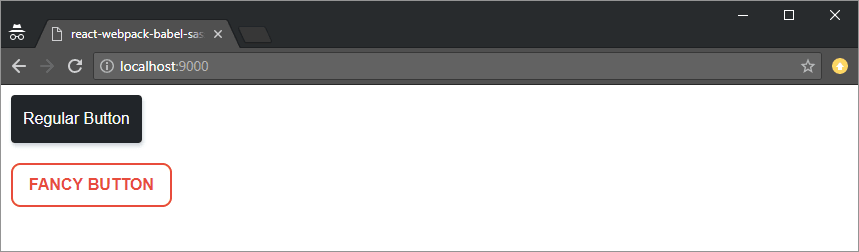
To show how this works we are going to create two components (Button and FancyButton), both of them having the same code and style class names, but that will render differently thanks to the modular approach.
src
├─┬ button
| ├── button.jsx
| └── button.scss
└─┬ fancy-button
  ├── fancy-button.jsx
  └── fancy-button.scss
For each component we are going to add a jsx file with the component definition:
import React, {Component} from 'react';
import styles from './button.scss'

class Button extends Component {

  render() {
    return (
        <button className={styles.button}>{this.props.label}</button>
    );
  }
}

export default Button;
Both buttons have the same code, the only difference is the class name. In order to reference the class name
from the component SCSS we will use {styles.button}, where styles is the
reference to the SCSS file and button is the name of the class defined within this file.
We will also add an SCSS file with the styles for each button component:
@import '../styles/partials/variables';

.button {
  /* ... */
}
Again, for both components, the structure and class names are the same for both buttons, only difference are the inner style definitions.
Finally, we add both buttons to our App component:
import React, {Component, Fragment} from 'react';
import Button from "./button/button";
import styles from './styles/main.scss';
import FancyButton from "./fancy-button/fancy-button";
class App extends Component {
render() {
return (
<Fragment>
<Button label="Regular Button"/>
<FancyButton label="Fancy Button"/>
</Fragment>
);
}
}
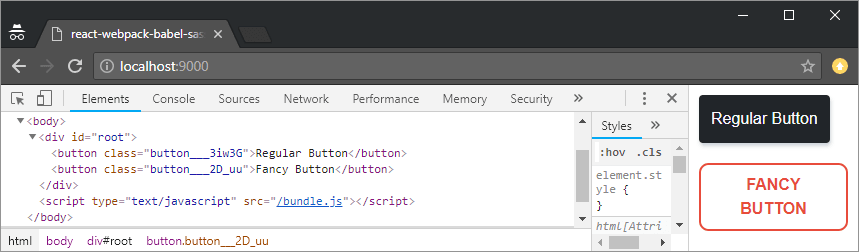
export default App;When the page is rendered we can see that although both components share the same class name, each of them is rendered with the styles defined in its own SCSS file.
If we inspect the class names for each button, both will have the same class name (button) but with a different
suffix added by the css-loader:
Conclusion
This post is a tutorial to create a basic React application with support for Sass styles, Babel, and Webpack 4. The tutorial shows how to install all dependencies and how to setup Webpack and Babel to transpile React jsx files into regular Javascript. In the last section, there are instructions to add support for Sass using global styles and per component styles using CSS modules. The post is meant as a guide to creating boiler-plate configuration whenever starting a new React project. As your project grows with more components, consider using barrel exports to simplify your imports and keep the codebase organized.
The full source code for this post can be found at GitHub.
You can also check the source code for Isotope mail client which is using these techniques for the front-end component build. And here an introductory post for the application and its features.


Comments in "React : Babel + Webpack + Sass boilerplate application"
once again many many thanks
THX a lot dude! ))